Are you wondering how to remove the window tint on your vehicle? In this article we will go over how to remove car window tint with hair dryer.
Most car window tint is applied to the inside of the car window, which can make it difficult to remove.
There are a few reasons you might want to remove the tint film, including if it’s fading, peeling or bubbling, you’re selling your car or buying a car, or you simply don’t like the way it looks anymore.

Removing window tint can be a time-consuming and a frustrating process, but there is way to do so with a hair dryer at the comfort of your own home.
Can You Use A Hairdryer To Remove Window Tint?
Yes, yes you can!
You may be surprised to learn that you can use a hairdryer to remove window tint if you don’t have a heat gun nearby.
While it may take a little longer than using a commercial tint removal solution, it is a much cheaper option.
Plus, it is a relatively easy process that anyone can do.
How To Remove Window Tint Using A Hairdryer
Step 1: Gather The Supplies You Will Need
You will need:
- Hairdryer
- Glass Cleaner
- Cloth
- Razor Blade/Knife
- Paper Towels
- Soapy Solution
Step 2: Heat Up The Hair Dryer
You need to start by heating your car’s window tint with your hair dryer.
To do this, turn on your hair dryer to the highest heat setting, and get close to the window.
Go for the corner of the window tint because they tend to be the weakest areas.
So, hold the blow dryer 2 inches away from the corners until the fringe starts to lift.
With this procedure, it should lift in about 30 seconds, and you will be able to pry behind the film with your fingers, or with a razor blade at the corner of the tint and peel the tint back.
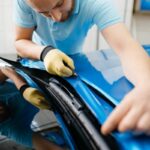
Step 3: Begin To Slowly Peel Back The Tint
When the window tint starts to peel, do not switch off your hairdryer. Instead, keep the hairdryer on the tint and maintain the same distance from the glass as before.
As you keep heating up the window film, the hair dryer’s heat will soften the glue holding it in place and allowing you to peel the tint until it comes off from the window completely.
Step 4: Apply A Soapy Solution To Any Areas That Are Proving Difficult
If you’re struggling to remove the car window tint, don’t worry–there’s a solution. Just apply a soapy solution to any areas that are giving you trouble.
The soap will help break down the adhesive holding the tint in place, making it much easier to remove. Just be sure to use a gentle soap–nothing too harsh or abrasive.
With this simple tip, you’ll save yourself a-lot of time and unnecessary frustration.
Step 5: Use A Razor Blade To Scrape Off Any Glue Residue
It’s important to get all of the residual tint adhesive off of your car windows before you attempt to apply new window tint or be able to properly see out your windows.
A razor blade is the best tool for the job, and it’s relatively easy to do.
First, make sure the razor blade is sharp and clean. Then, start at one corner of the window and scrape off any residual adhesive in a slow and steady motion.
Be careful not to scratch the glass while you’re doing this. If necessary, you can use a credit card or another similar tool to help loosen up the adhesive.
Once you’ve scraped off all of the residual adhesive, wipe down the window with a clean cloth to remove any debris or residue.
Step 6: Clean The Windows With Glass Window Cleaner
When it comes to cleaning your car windows, there are a few things you’ll need: glass cleaner, paper towels or a lint-free cloth, and elbow grease.
Working one window at a time, squirt glass cleaner onto the towel or cloth. Gently wipe the surface of the window in a circular motion until the entire window is clean.
Finally, use a dry part of the towel or cloth to buff away any streaks. Repeat this process for all your windows. And voila! You now have clean and streak-free windows.
Why Would You Want To Get Rid Of Your Window Tinting?
Most car window tint films will eventually need to be replaced. The main reasons are because it bubbles, fades, or gets scratched.
Newer window tints are usually of a higher quality and can last longer if they are maintained properly.
Additionally, some states have laws that require a certain level of transparency for car windows so if you have purchased a vehicle with window tint thats not within your state regulations, you’d need to remove them to pass your vehicle inspections.
Conclusion
In conclusion, if you are trying to find a way to remove your car window tints at home , you may have come across the hair dryer method.
That is correct. Yes you can use a hair dryer to remove the window tints.
Removing window tint is a time-consuming process, but it is possible to do it yourself at home.
By following the steps that were outlined in this article with a little bit of elbow grease, you can save yourself money.